DIY Minky Satin-Trimmed Baby Blanket
[caption id="" align="aligncenter" width="570"]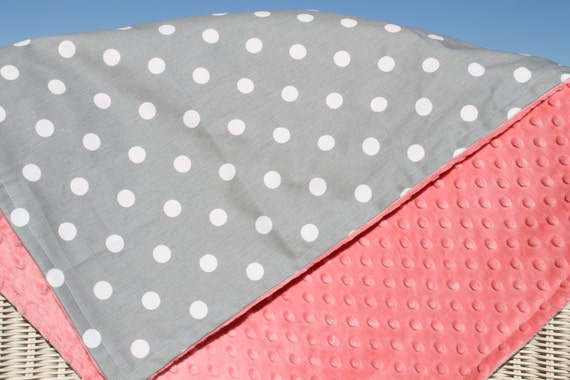 I found this inspiration while shopping Etsy. I loved the coral, gray and white combo and decided I am good enough at sewing straight lines with my sewing machine to take on a blanket.[/caption]
Skill level: Some sewing experience. I once followed a tutorial for making my own grommet curtains, and I have sewn a duvet cover and some pillow covers. None of which I would have considered high quality enough to sell to someone else, but good enough for us!
Cost: More than buying it off Etsy. Likely because I didn't have time to shop for the best deals on fabric, nor was I buying in quantity. The gray chevron minky was particularly expensive, and I couldn't find it at any of the "box" stores so had to custom-order online. Time: Not much. Will vary depending on your sewing skills, but I'd say 2 hours, tops. I worked on it for 20 minutes here and there when I couldn't sleep.Supplies:
 White thread
45" square of fabric for each side
Sewing machine
Pins
Satin Blanket Binding (I purchased at Hancock Fabrics)
White thread
45" square of fabric for each side
Sewing machine
Pins
Satin Blanket Binding (I purchased at Hancock Fabrics)
We already had the coral fabric because I plan to make curtains for D's room from it - I bought extra in case I decided to make an extra set to sell in the store, or to do small projects with...like this blanket!

Chad and I stopped in at Hancock Fabrics one day to grab some minky. He had no idea what "minky" was - and for those of you who also don't know - it's SUPER soft fabric that feels like it sounds. People even make cloth diapers out of this stuff, it's so soft! I showed him the options, and he didn't like the dotty minky (like in the inspiration photo). This guy has something against polka dots in general.... So I found the chevron stuff online!

I figured I didn't even need a pattern to re-create the inspiration photo. Pin the "good" sides of the fabric together in a square, sew 90% of it together, turn it inside out so the "good" sides were out, and sew about 1/4" in from the edge to finish. Bam.
But, I wanted a nice, satiny edge, too! Babies love satin, right? I want this to be "the" blankie that D loves and keeps until it just won't keep together any longer...so I found this inspiration: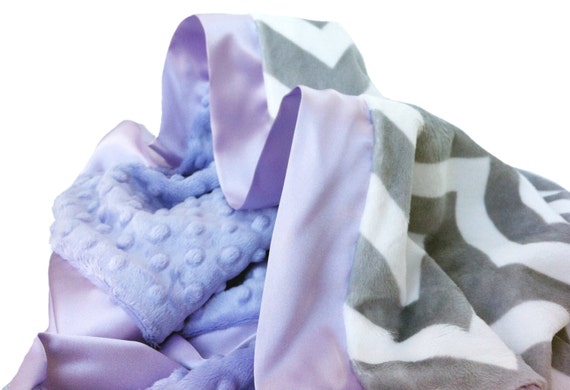
And then I found this tutorial online, which I followed step-by-step (with the exception of her fabric choices, obviously).


 How gorgeous is the bassinet my Mom found us, too? Chippy white paint (don't worry, it's been sealed with zero-VOC clear sealer to prevent any lead paint issues) and original wood. We <3 it![/caption]
I am sooooo happy with how it turned out! Halfway through adding the satin trim, I showed Chad - and even he was impressed. He said something along the lines of "family heirloom."
 The best part? It matches her new dresser so beautifully. Here is a sneak peek at the dresser - which is another blog post waiting to be finished. It's obviously a work in progress in this photo, but you can clearly see the finished color on 3/4 of it!
 What projects did you work on last weekend?
Comments (8)
This room is going to be pure fantasy for your little newbie. So fun!
Thanks, Cheryl! We hope it’ll be a great space for her to grow and learn and …sleep :)
can you tell me where you found the Coral fabric. I’m going crazy searching for some..trying to make my baby girls bedding of this coral and teal. Your project is beautiful
We got it on Fabric.com! The manufacturer is Premier Prints – we have the same design in different colors on our dining room curtains, too – and the fabric has held up beautifully. We also use different designs from them for a lot of the reupholstery projects we do in the store. Good luck!
I’m having problems with the back side of the blanket. When I sew on the short side edge of the satin, it leaves an ugly unsewed on edge on the satin longer side which makes it rough and unfinished looking.
I would make sure your stitch height is big enough. Mine “caught” both edges of the satin on each side, with a tall zigzag stitch. (That’s official terminology ;) )
Thanks, but let me explain again. If I sew zigzag on the short side of the satin, lining up the zigzag with the edge of the satin so that the entire stitch is on the satin, when I flip the blanket over, the wider satin has the zigzag not reaching the edge because it is taller. A longer zigzag just makes more zigzag on the shorter side of the satin. Now if I sewed on (from) the wider side of the satin- instead of the shorter side- with a longer zigzag stitch, that might catch the shorter side edge. Have I been sewing from the wrong side?
Ah. Yes, that makes sense! I cant remember anymore which side I sewed on, but I just looked at my blanket, and on the long side my stitches are all on the satin, and on the short, they are half on the satin, half on the fabric – that also happens to be the side with the minky, so it still looks nicely finished!